How much memory do you need today?
The tale of restoring an ’80s timeless classic, harking back
to an era when 128KB were deemed more than sufficient.
Click to start or simply scroll down
Midlife crisis
I understand that you may be feeling a bit perplexed at this point, so let me begin anew, or at least with the medical condition I’ve self-diagnosed to rationalize everything: the midlife crisis.
I acknowledge that, at “only” 36 years old, with the advancements in scientific progress extending the average life expectancy well beyond 70 years, It may seem premature to begin contemplating about it. However, I contend that the relentless pace of our lives has accelerated this moment of reflection, prompting us to nostalgically revisit past moments and rediscover the allure of childhood possessions — whether acquired, lost, or long-dreamt of.
In my case, I can affirm that I was enticed by the notion of an improbable mission: the restoration and repair of an iconic computer from the past, armed with no specific technical expertise other than a robust and innate passion for computers. The chosen endeavor revolved around a genuine instant classic in the realms of computer science and industrial design: the original Macintosh.
The Macintosh
Originally overseen by Jef Raskin, the “Macintosh” project was envisioned as Apple’s inaugural computer, specifically targeted at families and marketed with a price tag below $1,000 01.
However, the trajectory took an unexpected turn in 1980 when Apple, citing Steve Jobs’ intense perfectionism and limited team-building skills, decided to reassign him from the helm of the flagship “Lisa” project.
Apple’s strategy was to shift Jobs to a project of lesser prominence like the Macintosh, one deemed less pivotal to the company’s future, where his disposition could be more constrained.
Jobs found himself transitioning from the design of a groundbreaking computer like the Lisa, Apple’s first professional workstation featuring an operating system with an iconographic interface and mouse-operable windows — to the Macintosh, a more traditional, budget-friendly computer with a text-based operating system, targeting families.
Jobs’s leadership
Under Jobs’s leadership, his initial response was to distance Raskin and decisively reshape the project. While the Macintosh was intended to be an economically accessible computer, Jobs believed it couldn’t be solely from a financial perspective.
Recognizing the need to cater to individuals unfamiliar with computers, the Macintosh couldn’t compromise on the user-friendly experience offered by a graphical interface and a mouse. Jobs envisioned the computer being prominently displayed in homes, akin to any other household appliance, and insisted on a design that was nothing short of “insanely great”.
This new trajectory, coupled with an exceptional marketing campaign, propelled the project into unprecedented levels of hype 01. However, it also led to a substantial increase in the costs associated with design, production, and promotion.
The Macintosh made its debut on January 24, 1984 02, hitting American shelves with a price tag of $2,495.
Despite its competitive pricing, especially when considering the initial positioning of the Lisa at $9,995 and the incorporation of numerous new technologies and features inherited from it, the Macintosh still entailed hardware compromises. Its placement in that price range proved challenging for the average American family.
While the goal of bringing the concept of a graphical interface and mouse to a broad user base was partially achieved, thanks to widespread promotion and adoption of the Macintosh in educational (schools, universities) and professional environments (constituting 90% of total sales), it fell short of reaching the intended consumer market 02 03.
The Macintosh became a topic of conversation for everyone, but it was not yet accessible to everyone, and sales never fully met expectations. Jobs bore the brunt of this setback, to the extent that he was ousted from the company he co-founded before the year’s end.
- Steve Jobs (Book) - Walter Isaacson (2011)
- When the Mac Came to Market Street - LeBow College of Business Drexel University (2014)
- Computer makers find rich market in schools - New York Times (1984)
Let the search begin
Okay, let’s begin with the obvious. The original Macintosh (128K 04) hasn’t been available for over three decades. Obtaining one now requires finding someone willing to part with it or, as my wife puts it, “to get rid of it”.
While I’m sure there are numerous sales channels and opportunities in the United States, in Italy, aside from a stroke of luck at a vintage electronics market, the primary option is eBay.
Key considerations
I must concede that I may have overstated in the introduction: even at the time, 128KB of RAM wasn’t quite sufficient, a realization users came to fairly quickly 05.
A few months later, Apple took evasive action by quadrupling the RAM with the 512K model. Many early adopters opted to upgrade, undergoing a complete motherboard replacement as the RAM was soldered onto the PCB. This approach proved more cost-effective than the alternative, which involved bearing the expense of RAM in addition to specialized labor for individually replacing all (16) chips.
Despite being a mass-produced industrial product on a global scale, with hundreds of thousands in circulation, the rush to upgrade (justifiable at the time) and the subsequent need for maintenance or component replacement over the years have rendered intact units a rarity.
The market
Machines that remain entirely original and operational are currently being sold at prices ranging from $2,000 to $4,000 06. This extensive range is frequently attributed to the aesthetic state of different components, the production week indicated by the serial number, and the inclusion of accessories and accompanying software.
Fortunately, the value experiences a sharp decline when, under similar conditions and equipment, the computer is marketed as non-functional, often due to a problem identified to varying degrees by the seller.

How beautiful! Macintosh 128K front view. 
What a beauty! Macintosh 128K Rear View.
The right problem
The notion of acquiring one for restoration, akin to reviving an old vintage car that no longer runs, intrigued me. The immediate allure of substantial cost savings persuaded me to delve deeper (unaware that I would eventually spend the equivalent of obtaining a fully operational unit in the ensuing months). My requirements were:
- A Macintosh with a commonly documented issue.
- A problem complex enough to require attention but not beyond my capabilities.
- An issue seemingly confined and identifiable through a photograph or an error code.
- A Macintosh complete with essential accessories: keyboard, mouse, power cable, and boot floppy.
- An aesthetically pleasing Macintosh, serving as a
paperweightdecorative item if repair proved unsuccessful.
After months of research and numerous rejected purchase proposals, I found the ideal synthesis of these requirements in an eBay auction by a vintage electronics store in Tucson, Arizona.
Adding to the myriad variables inherent in acquiring a non-functioning item from almost four decades ago was the challenge of an intercontinental journey. Despite the uncertainties, I decided to take the leap: a deep breath, closed eyes, and a click on the “Buy it now” button 03.
Over the ensuing three weeks, I cycled through various emotions, from pure excitement to regret and occasional despair.
Then, it arrived. Finally, the courier at the door. Unboxing time. Yes! That’s it! What a beauty! 05-06.
Admittedly, it’s a bit dirty with signs of weathering, but try spending three decades in an attic, crossing a continent, and presenting yourself like this for a first date.
- Macintosh 128K - lowendmac.com
- The history of the Apple Macintosh - mac-history.net
- eBay auction closing price range in Europe (from July to December 2022) for working Macintosh 128K units, including at least a keyboard, mouse, power cable, and startup floppy disk.
First boot
Sad Mac
We have a problem
Okay, the initial attempt to boot didn’t go as planned, but I shouldn’t have expected anything different.
After swiftly unpacking, connecting a voltage reducer to the socket, and powering up the computer 07, I hear a familiar [beep], as anticipated from all the repair videos on YouTube that I’ve watched to prepare myself.
The Devil’s Interval
This is the renowned Apple boot sound, still present in the current lineup across all Mac products. However, the complete and reassuring sound we hear in today’s Macs is the result of subsequent work 07 initiated in 1988 by Jim Reekes, a sound engineer.
In 1984, hardware limitations prevented achieving such sophisticated sounds. Consequently, it had to be simplified into something much more basic: a three-note chord with sounds that were far from soothing, historically known even in the 1800s as the “devil’s interval” 07.

Motherboard detail Location of RAM chips inside the motherboard.
Sad Mac
Displayed on the screen is the Sad Mac, one of the legendary icons from the original set designed by Susan Kare specifically for the first Macintosh. While it stands as a genuine pixel art manifesto 08, unfortunately, in my case, this icon identifies an error, and a big one at that.
During this boot phase, the computer conducts tests on various components, and the memory is filled with data for a subsequent consistency check. The failure of this test indicates a hardware malfunction, identified by a specific error code displayed immediately below the Sad Mac icon.
The code I won is 04040A.
In the 80s and 90s, detailed information to decipher these error codes wasn’t extensively provided even in the technical service manuals for installers and repairers 09. For Sad Mac, the suggested generic process often involved replacing the entire logic board.
Fortunately, with the advent of the Internet, Apple has digitized and publicly shared more detailed indications, allowing users to interpret the code comprehensively and pinpoint the problem to more specific components.
The table at this link serves as my Rosetta Stone for decoding the error.
It’s a memory trap!
Finally, the code is “clear”. The first two characters (04) represent the type of failed test, “Memory Mod3 test”, while each of the next four characters (040A) identifies the status of a set composed of four memory chips, totaling 16 chips.
The specific damaged chips within a set are identified by a number (1, 2, 4, or 8), corresponding to a pair of coordinates with a letter (F or G) and a number (from 5 to 12), determining their precise location on the motherboard 08.
| 0 | 4 | 0 | A |
|---|---|---|---|
1G9 | 1G5 | 1F9 | 1F5 |
2G10 | 2G6 | 2F10 | 2F6 |
4G11 | 4G7 | 4F11 | 4F7 |
8G12 | 8G8 | 8F12 | 8F8 |
If you’ve stuck with me this far, under the assumption that each character can only have a value of 1, 2, 4, or 8, the question you’ve likely pondered is: why the hell is there an A in my error code?
The answer came to light through the experience of a user on the 68kmla.org forum, who, like me, encountered an error code with an unexpected character. Each character identifies the faulty chip within a set of 4 chips. However, when more than one defective chip exists in the same set, the character corresponds to the sum of each in hexadecimal format.
The A (10 in decimal format) in the last character of my error code, therefore, represents the sum of the 2 + 8 chips, corresponding to positions F6 and F8 inside the motherboard.
- Hear the Evolution of Apple’s Iconic Startup Sound for the Mac - Wired (2014)
- The Woman Who Gave the Macintosh a Smile - The New Yorker (2018)
- Apple Service Guide for Macintosh Computers - Apple (1991)
We can do it
We have successfully identified the three malfunctioning memory chips and their locations on the motherboard. These are the MT4264 10, a 64Kbit DRAM chip manufactured by Micron Technology, which was practically a standard in computers of that era, albeit under various names and codes depending on the manufacturer 11.
This integrated circuit, no longer in production for many years, is now only obtainable through private sellers offering used parts or from suppliers specializing in vintage components.
Despite numerous eBay auctions being geographically closer, I chose to rely on Jameco 12, a well-known Californian retailer. This decision was influenced by recommendations from specialized forums during my preliminary research 11.

RAM new chips New 4264 chips just arrived. 
Motherboard detail New 4264 chips installed on the board.
Let’s open it!
Okay, I understand that the disassembly process might look straightforward and quick on this animation, but the reality involves dealing with screws, cables, dust, and cathode ray tubes that can hold extremely high electrical voltages (up to 10kV), even several minutes after being powered off 13.
As the first computer created with non-professional users in mind, the Macintosh 128K was deliberately designed to discourage self-repair, thereby making even the simple act of opening its casing a significant challenge.
For its exterior, Torx T15 security screws, which were quite rare at that time, were used. These screws were deeply set near the upper “handle”, necessitating the use of an extendable or sufficiently long screwdriver for access 14.
Unlike any other computer of its era, the Macintosh was deliberately “armored”.
However, as of 2024, the situation has greatly simplified. All necessary tools are readily available in hardware stores. With basic manual skills, removing the motherboard and its damaged chips is straightforward, especially with detailed guides like the iFixit detailed teardown available.
Open heart surgery
At this juncture, I’d love to claim that I channeled my inner MacGyver and replaced the damaged chips on the board using nothing more than a banana and a paperclip. However, my modest soldering skills dissuaded me from attempting repairs on a board that is not only older than myself but also holds great sentimental value.
Yes, I cheated. My family includes several individuals far more adept with hardware than I am, and I couldn’t pass up the opportunity to entrust the task to my cousin, Luca Giorgi. Luca is a professional electronic designer and has always been accommodating of my caprices.
With patience and precision, Luca desoldered each pin, using a tin suction pump to carefully remove the solder, thereby liberating each damaged chip from its position 09. Following the thorough cleaning of the area 10, he skillfully resoldered the 16-pin sockets onto the board and installed the newly acquired chips 12.
Now, the moment of truth: crossing our fingers and attempting to power it on once more.
The boot sound remains that familiar, uncomforting tone, but this time, the monitor shows signs of life. Contrary to the previous “Sad Mac” screen of darkness, we are greeted with a lit screen, revealing the full luminosity of the monitor for the first time.
The central icon confirms a successful start-up, indicating that the system is awaiting a floppy disk to proceed. We might not be fully prepared for this stage yet, but the most crucial problem has been resolved. The only word that comes to mind is “bellissimo” ~ “beautiful” 13.
- Micron MT4264 Technical sheet - Micron Technology - tvsat.com.pl (1991)
- Examples of 4164 class RAM chips - minuszerodegrees.net
- Jameco IC 4164 product page - jameco.com
- The Truth About CRTs and Shock Danger - Daniel Knight - lowendmac.com (2007)
- Macintosh 128K Teardown - iFixit (2014)
Hard disk?
Which hard disk?
I’m sure that when asked, “How much memory do you need today?” you might immediately think of the capacity of your hard drive, SSD, or your general permanent storage device.
Here’s an interesting fact: Apart from a small ROM for basic software, the Macintosh 128K has no permanent storage. Beyond its 128KB of RAM, there’s no additional internal memory capable of preserving data through a computer restart.
This makes the floppy drive exceedingly important, as it’s essentially the only means not only for saving your work but also for simply loading the operating system to start a Macintosh.
Floppy drive
The 3.5-inch floppy drive featured in the Macintosh 128K was groundbreaking at the time. Apple was one of the pioneers in adopting this new format, which would later become the standard across the whole computer industry.
The compact size and sturdy casing of the floppy disk not only protected its integrity and surface from accidental damage but also transformed it into an aesthetically pleasing object and a “perfect example of good design” 15.
However, this initial version had its limitations. While the new standard by Sony already allowed for double-sided floppies with a formatted capacity of 720KB, the drive could only read and write on one side, effectively reducing its total capacity by half. Additionally, Apple introduced a unique hardware formatting standard that enabled saving up to 400KB on a single side, but this format was incompatible with any other systems 16.
Maintenance
Amidst the sea of uncertainties that come with restoring a retro computer, there’s one thing you can count on: your floppy drive will require maintenance.
Distinct from the purely electronic components inside the machine, the drive is primarily made up of mechanical parts that are responsible for sliding, housing, and ejecting the disk. These elements require proper lubrication to function correctly, and there is nothing worse than a lubricating grease left to dry in an attic for 40 years, as it can completely obstruct their functionality.
My Macintosh was no exception. The first floppy disk I attempted to insert struggled to even pass the entry threshold.
Let’s get our hands dirty
Once the Macintosh casing is opened, the disassembly of the floppy drive is almost immediate: just unscrewing a couple of screws releases the unit from its lower support, which also houses the motherboard.
As expected, what is in front of us is a drive whose side guides are completely jammed by the now solidified 1984 lubricating grease. Despite the daunting appearance, restoring the mobility of all mechanical components was straightforward:
- Cleaning each joint of the solidified lubricating grease with a cotton swab dipped in alcohol 15
- Reapplying fresh lubricating grease 16
- Manually testing the mechanical sliding movement 17
Simple, right? Especially when you have access to a step-by-step video guide like the one JDW created on their YouTube channel.
Now, all that’s left is to reassemble the computer, insert the boot floppy 18, and once again, cross our fingers...
- The Design of Everyday Things - Donald Norman (1988)
- Macintosh External Disk Drive - Wikipedia
- Apple Macintosh (128K) - Retroviator (2021)
Reassembly
Power on
Hallelujah
Not old. Vintage.
I must admit, this chapter was not originally part of my plan. For a while, I had considered my restoration project complete:
- All the damaged components were repaired.
- The computer was operational and usable.
- I had found the ideal furniture at Ikea to showcase and use the Macintosh, occupying minimal space in the house
and thereby avoiding being kicked out by my wife. - Additionally, I had just discovered the Floppy Emu, a floppy emulator that would enable me to explore all the software ever created for the Macintosh 128K without further financial strain.
So, what more could I have asked for? Yes, it’s true, the casing was still somewhat dirty and had yellowed over time, but wasn’t this a perfect reflection of its history and the character of this iconic machine?
For a while, I convinced myself of this romanticized view and thought it unnecessary to risk reopening and completely disassembling a Macintosh that had just begun working again, merely for cosmetic reasons. That was until my timeline started to be filled with articles and videos about retrobright, and a new doubt started to take root in my mind.
Retrobright
This mixture was developed by Dave Stevenson, an English chemist with a passion for retrocomputers 18. Its purpose is to restore the original color of ABS plastics 19, a material extensively used in the casings of various electronic devices over the past 50 years.
Stevenson hypothesized that the yellowing was not due to the ABS itself, but rather to bromine, an element added to ABS for its flame-retardant properties. When exposed to UV rays from the sun, bromine naturally tends to revert to its original brown color, thereby causing the entire plastic to yellow 20.

Retrobright Gel ready to spread. 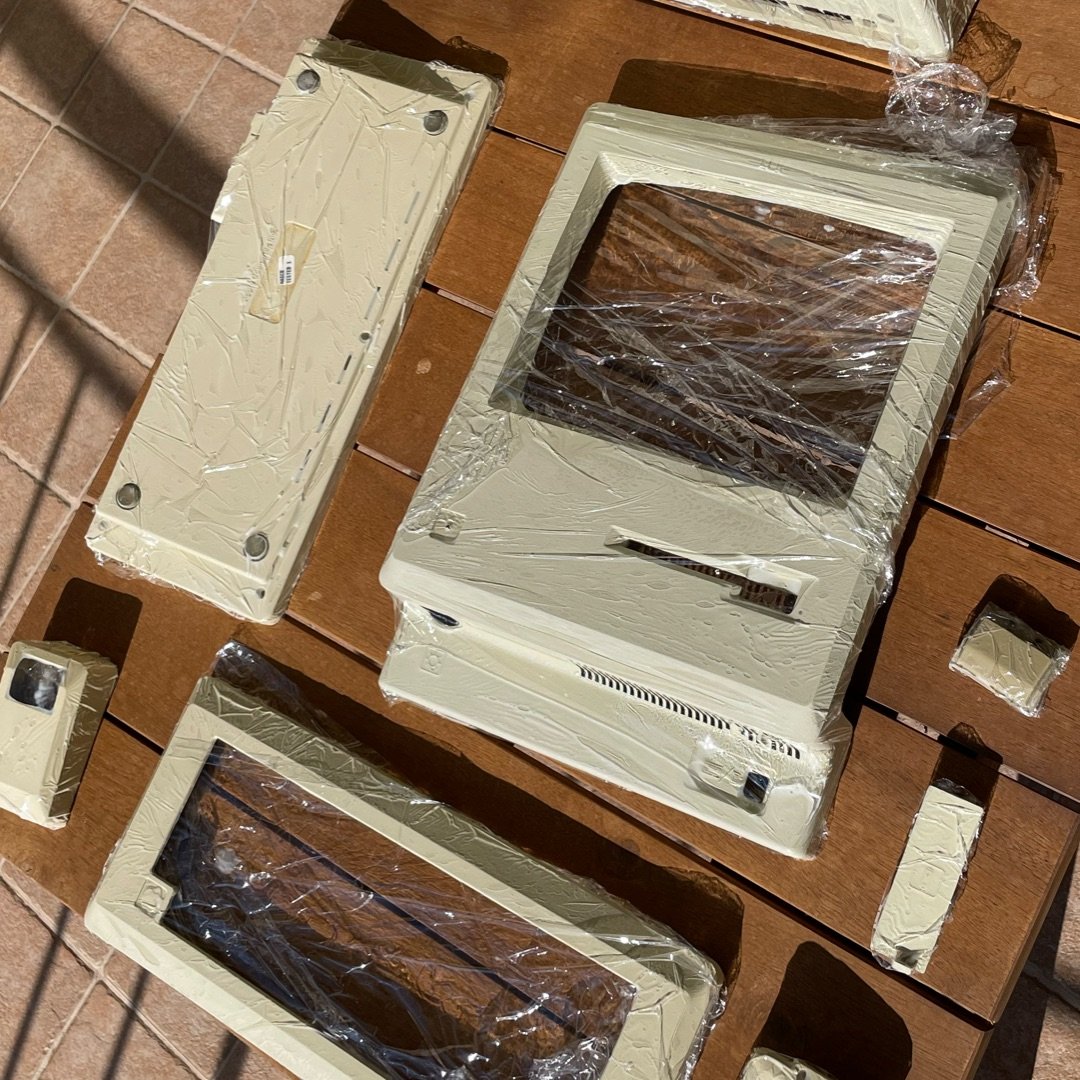
Retrobright Gel coated on plastics and exposed to the sun. 
Disaster White spots and streaks on the surface. 
Disaster White spots and streaks on the surface.
The Retrobright formula was made public in 2008 and consists of a blend of high-concentration hydrogen peroxide (10%–15%), active oxygen, and thickeners to create a spreadable product.
The outcome of this formula is a gel. When applied to plastics and exposed to UV rays, it is intended to return the oxygen molecule to the bromine, thereby it should reverse the yellowing process.
I use the conditional tense because, since 2008, the community of enthusiasts has continuously experimented with and modified the compound, leading to the creation of numerous variations 21. Over the years, there have been documented instances of failures and long-term effects on plastics. These findings have raised questions about both the role of bromine and UV rays in the yellowing process, as well as the effectiveness and safety of the mixture and method itself 22.
I confess that despite the wealth of information available for research, my complete lack of knowledge in chemistry, combined with the overwhelming number of highly positive reviews, led me to overlook any potential risks or negative aspects. I wanted had to try!
Everything under control
For my experiment, I selected one of the brightest (and hottest) days of the year, considering the significance of UV rays in the process. Prior to starting, I removed any labels, logos, or tags that might get damaged 20. Each piece of plastic was thoroughly washed to eliminate any dirt or dust residue from the surface 21-22.
I prepared about a liter of Retrobright and gradually transferred it to a basin for application on each plastic piece 23. To prevent the mixture from evaporating quickly under the sun, I followed several tutorial suggestions and covered each piece with a film 24. In hindsight, this was the first of many mistakes.
After approximately 2 hours of exposure, I decided to check the results of this initial attempt, and that’s when I encountered my first major setback. Despite the film covering, the gel had almost entirely evaporated and had done so unevenly, following the creases of the film. The outcome was disheartening. The gel had only managed to lighten certain areas of the plastic, creating stains and streaks across all surfaces 25-26.
Panic
Following that setback, I embarked on a series of hasty attempts, hoping that another application might even out the coloration. Initially, I repeated the process without the film, refreshing the mixture every 20 minutes throughout an entire morning to prevent evaporation. Subsequently, I replicated the procedure in an environment with controlled UV light 27.
In both instances, I managed only to lighten the different areas proportionally. The darker parts became lighter, but so did the already light areas, which further intensified and essentially preserved the initial streaks.
Plan B
It dawned on me that any further attempts would be futile, only serving to further degrade plastics already stressed by various treatments. This realization was followed by a few weeks of discouragement, during which I hesitantly returned to eBay to browse through auctions for exorbitantly priced spare parts. Eventually, I settled on the only viable option: painting the plastics.
Interestingly, Apple had abandoned the practice of painting plastics with the introduction of the Macintosh. They believed that using ABS plastic already colored appropriately would prevent the natural variation in paint color when exposed to sunlight. Ironically, the opposite occurred: all the painted plastics from earlier models withstood the test of time much better 23.

Plastic painting Professional back plastic painting. 
Plastic painting Professional plastic painting on the front, keyboard and mouse. 
Before yellowing state before retrobrighting and repainting. 
After Yellowing status after repainting.
This time, thank God, I decided it was best to directly consult professionals. My sole task was to find the correct color reference 24. I entrusted the job to a local body shop specializing in plastic painting, and they executed the work with great precision and care 28-29.
What can I say? The Macintosh had not only become “presentable” but had almost turned into a showpiece 31, and I had finally run out of ways to potentially compromise its safety again.
The restoration could at last be considered complete. Just in time to celebrate the 40th anniversary of the Mac!
- The “Retr0bright” Project - retr0bright.com (2008)
- Acrylonitrile butadiene styrene - Wikipedia
- Retr0Bright: how to restore yellowed plastics (IT) - Giacomo Vernoni
- New retrobrite techniques - The 8-Bit Guy
- RetroBright treated plastics re-yellowing even with minimal light exposure? - Terry Stewart’s (Tezza’s) Blog
- What color was “Apple Beige”? - Ben Zotto
- Mac 128k color - 68kMLA Forum